
Here are tips for catching more Tuna offshore Virginia Beach.
WHAT: During this “How-To”, we’ll primarily be focusing on the Yellowfin Tuna ( Thunnus albacares). Many of the tactics and fishing holes will easily transition to cover the other tunas like, Big Eye, Blackfin, and Longfin. Bluefin will be discussed separately. So lets dive in.
Yellowfin are a pelagic species found in primarily tropical to subtropical waters around the world, except the Mediterranean Sea. They can range from small juvenile fish around 15 inches to large adults over 80 inches, possibly tipping the scales close to 400 pounds. The current IGFA record sits at 388.5 pounds. Most found in our offshore waters range from 15 pounds to over 100.
Yellowfin are school swimmers, traveling with other Yellowfin or other tuna species, like Skipjacks or Big Eyes, of the same size. Larger tunas can also be found mixed with pods of Porpoise.
Yellowfin feed mostly on small baitfish like anchovies and small mackerels, flying fish and squid. However, they have been found feeding on crabs, shrimp and other tunas. In proportion to its total body size, tuna have relatively small mouths. They seem to favor eating more of a smaller prey which helps provide higher levels of protein for the tuna. Because of their highly migratory tendencies and the fact they can reach speeds of over 30 mph, the high protein helps fuel them. This will come into play in the selection of baits for catching tuna. They are also competitive, sight feeders. They can be triggered into a feeding frenzy by another fish’s feeding habits.
A Yellowfin has an average life span of up to 8 years. Most are sexually reproductive by the time they reach a length of 40-47 inches or 2-3 years old. Some can be mature within 12-15 months or around 20 inches. They reproduce year round, but the primary time is in the summer months. Tuna grow rapidly. At a year and a half, they can weigh 8 pounds or more. At the age of 4, they can weigh in excess of 140 pounds.
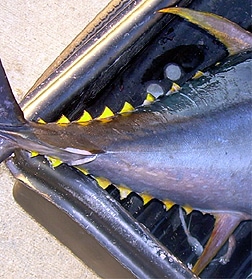
Identifying a Yellowfin can be tricky, especially juveniles. They can easily be confused with schoolie Bluefin. It is important to know the identity of the fish you’re ready to gaff. An illegal Bluefin could cost plenty in fines, not to mention, hinder the fishery’s survival. A Yellowfin has a fusiform body, meaning it tapers towards each end. It is however more slender than a Bluefin’s or Big Eye’s body, which is stocky at the shoulders. An adult Yellowfin will have longer anal and 2nd dorsal fins and are yellow in color. The older the fish, the longer these get. The quickest distinctive feature to ID the Yellowfin is their pectoral fins. The pectoral fins on a Yellowfin reach past the beginning of the second dorsal fin, but not past the end of that dorsal. The pectoral fins on a schoolie Bluefin are short and don’t extend past the middle of the first dorsal. Yellowfin are dark blue on the back with a yellow-gold stripe running laterally from head to tail. Their undersides are silvery-gray with occasional white, vertical lines and dots. The finlets on a Yellowfin are bright yellow and trimmed in black.
WHEN: From our Mid-Atlantic location, we are fortunate to be able to target Yellowfin virtually year around. We sit in striking distance to the early Spring and Winter tuna runs off the Outer Banks of North Carolina, the mid Summer blitzes out of Ocean City , MD, and the early summer and Fall runs out of our own Virginia ports. Many trailered boats, along with the larger private sportfish and charter boats, are able to follow the Yellowfin migrations.

March through April find most anglers running the gauntlet that Hatteras Inlet can lay down. Here sometimes anglers find themselves at the docks because of high winds and steep surf, but once the weather falls in their favor, a short 20-30 mile run to the tuna grounds is nice. As the temperatures warm and the Gulf Stream starts to over take the cool Labrador Currents, the tuna start to move north. Oregon Inlet is now the starting point for the tuna hunt. This usually occurs from May through June. Mid June through mid July the tuna will be holding off of Virginia. Once the Summer heat appears and waters reach 80 degrees or more, the tuna are once again on the move and concentrate in the northern canyons off Maryland and New Jersey. They’ll hold here usually until the middle of October before they make their way back south with the advancing cooler waters. These times are all dependant on the weather, however. Prolonged warmer or colder temperatures can change the migration patterned by weeks up to a month.
WHERE: Yellowfin are comfortable in water temps from the 65 up to 80 plus degrees, but most are found in those midrange upper 60’s to mid 70’s. Many are caught on the surface when feeding, but they can be found below thermoclines as deep as 300 feet or more. Water depths at the most prominent fishing grounds range from as little as 15 fathoms to more than 100 fathoms. This, coupled with the wide range of water temperature tolerances, can make finding Yellowfin somewhat difficult. There are other things to look for when targeting tuna.
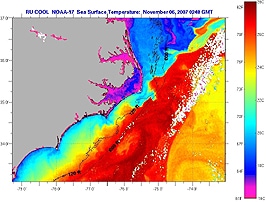
Homework is the most important tool in finding any fish, but even more so while targeting an offshore pelagic. If you’re planning on running 30 to more than 65 miles offshore, you need to be able to narrow down your starting point. The first thing many look at is sea surface temperatures. There are now numerous websites that provide satellite information regarding sea surface temperatures (SST). Some are subscription based, but several are free of charge. What you want to look for on these charts are breaks in water temperature. Finding locations that have a degree or 2, or even a 3-5 degree break are possible areas for bait to hold, and thus the tuna. Temp breaks indicate opposing currents or upwelling, currents that bring nutrients from the ocean bottoms to the surface. These areas hold plankton and small baitfish, and the one thing that tuna like, is food. On the water, these differences in temps can sometimes be visible to the naked eye. Warm waters can be deep blue, near cobalt and clear, while the cooler sides can be greenish in color. Finding these temp breaks and color changes are great places to start searching for bait and your target Yellowfin.
Also look for bottom structure. Have a chart of the area you plan to fish at home. Study it with your SST close by. Look for deep drop-offs, sea mounts, fingers, or canyons. Any area with a drastic change in bottom contour is a possible “bait motel“. These variations will cause currents to change direction or upwell, thus bringing the plankton and nutrients, to the surface where baitfish and tuna feed. Wind driven water and “currents” will also concentrate bait on one side of the structure. For example in the Norfolk Canyon, if the wind is coming out of the north, baitfish will stack up on the south wall of the canyon. The repetitive link between all these starting points” is “a change“. Finding a change in temperature, change in water color/clarity, change in bottom structure/depth, or a change in current flow can help you find the bait. And the key to finding any fish, is finding the bait.
Another great tip for finding where the tuna are is talking with those that fish everyday. Walking the docks and chatting with captains, mates, and other anglers can provide some great info. Search fishing forums like VBSF.net for reports. Don’t take it all as Gospel though. Unfortunately some out there can be less than forthcoming and may send you in the wrong direction. Taking reports and combining it with your other “homework” will better you as a fisherman/fisherwoman and teach you to find the fish on your own.

Once you’re out there on the water, there are things you want to look for while running to the “starting point” and also while trolling around. One of the most sought after sights a crew can hope to see are Storm Petrels, aka Tuna Birds. These little black birds with their white backsides are a key to finding fish. Petrels feed on plankton, small baitfish and leftovers from feeding fish. They hover over the water picking up the small scraps. They can sea fish below the surface and will follow them waiting for a tiny morsel to rise within their reach. This is a great sign that there are fishing feeding and hunting in the area.

Other visual signs of recent fish activity are slicks. These will look like someone poured a can of oil on the surface. These are actually oils spilled by baitfish being consumed by tunas. Trolling upwind or up-current of the slick may put you right in the feeding blitz. The surface ripples caused by large balls of bait are a reason to stop the boat and drop lines. If the baits are on the surface, something is working them. Busting Skipjacks, mackerels, or flying fish can mean there are Yellowfin around. Troll the outskirts of the bait balls and wait for the screaming drags.
Whales and porpoise are also great signs of life and possible tuna. Tuna are known to school with porpoise for any easy meal. Porpoise use their sonar to find balls of bait miles away. Once on the move, the tuna will follow and score a quick, easy meal. Always bearing in mind the food chain will help you find bait, and finding the bait is key to finding the tuna. There are few restaurants 60 miles offshore, so when you find one patron, there are bound to be others around.
The most obvious sign is the site of boiling tuna. When these fish are feeding on a bait ball, they will be busting the surface and feeding like mad. The tuna will be rolling and jumping out after baits. Sometimes this is a great time to cast plugs or live bait instead of trolling.
There are several common hot spots for Yellowfin each year. Out of Hatteras, the Rock Pile, the 230 Rocks and the 280 Rocks can all be great locations for tuna. Oregon Inlet has the Point and the Tuna Hole as its major fishing holes. Virginia anglers head for several locations depending on the preceding factors. The Cigar, 10 Fathom Hill, Wayne’s World, The Fingers, and the Norfolk Canyon are just a few. The Eastern Shore holds some great tuna spots. The Parking Lot sits in only 15 fathoms. There’s also the 26 Mile Hill, the Crotch, and the Washington Canyon. Remember, these are just possible tuna grounds. The key is to find those “changes” and find the bait, and the tuna will be close by.
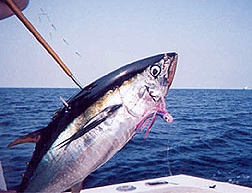
HOW: Yellowfin Tuna are one of the most sought after offshore fish by both recreational and commercial fishermen. Both groups target them for their excellent table fair. Whether served as sashimi, tossed on the grill, or blackened in an iron skillet, Yellowfin ranks as one of the best. But the best quality for recreational anglers is the Yellowfin’s heavyweight style of fighting. Once hooked, these fish dig deep and fight doggedly all the way to the boat. With its blistering initial run followed by its straight down tug-o-war, Yellowfin can bring you to your knees.

9-Line Spread

Small Boat Spread
There are basically three main methods to catch these bruisers; Trolling, Jigging, and Chunking.Each way has its own rigging involved. Here, we‘ll cover catching on the troll.
Trolling: The number of lines you have in the water will depend greatly on the size of your boat and your budget. Larger boats will of course be able to run more baits with comfort. That doesn’t mean they are at an advantage. Smaller boats can run a very effective spread with ease and catch just as many tuna as their big brothers. I do believe, however, that it is important you run as many lines as you can manage, and here’s why.
Tuna, like many fish, are opportunistic feeders. When they attack they can expend a tremendous amount of energy. They are less likely to chase a single bait swimming through the water, then they would be to investigate a large school of baitfish. The more baits you have in the water, the larger the “school of baitfish” the tuna sees and triggers his predatory instincts. Now more baits doesn’t necessarily mean more lines. Spreader bars and daisy chains play a manger role in a Yellowfin trolling spread. These multi-lured baits give you the “bait ball” look you want. I’ll also be using, Seawitches, Shooters, naked lures, like Green Machines, TCB’s, Heavy D’s, Bullets and cedar plugs (right).
When I set my tuna spreads, I am constantly thinking about a bait ball. The goal is to mimic what tuna see in nature. Bait balls are concentrated in the middle with weaker baits falling off around the edges. Your spread should look the same way. Baits can be added or removed, depending on your comfort level with running lines. Always remember the bait ball theme when changing out and positioning your baits.
The main Yellowfin spread that I run while working the pit on “Billable Ours” consists of 9 baits. I run (2) Flat lines clipped to transom mounted release clips, (2) Long Flats that are run directly off the rod tip, (2) Short Riggers and (2) Long Riggers from the outriggers, and finally a Shotgun bait down the middle. In any position, whether it’s the flats or the riggers, the opposing bait is set 6-8 feet behind its same position partner. For example, if the left short rigger is back 50 feet, then the right short rigger will be set 56-58 feet from the boat. This allows for tangle free turns. The same goes for left side/right side baits. Each bait will be between 10-15’ behind the preceding bait. If the right short is back 50 feet, then the right long will be set out 60-65 feet from the boat. You can run your spread back as far as you’d like, sometimes when fish are “boat shy” you’ll need to drop the spread back even further. The thing to remember is to keep the spread tight in relation to itself.
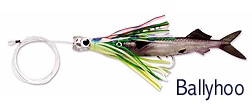
Generally boat speed will vary from 5-9 knots, but most of the time we’re fishing in the 6-6.5 range. The determining factor for speed is lure/bait action. While trolling you want to go fast enough that there is no slack in you lines, yet slow enough that you baits aren’t flying out of the water. Seawitch or Shooter covered ballyhoos should skip over the surface and occasionally swim just under the water. They should not jump so violently that they fly in front of the fishing line. If you need to drop the spread back, you may need to bump up your trolling speed. A bait will loose its action the further you drop it back. Therefore, increasing your speed just a little will allow you to have the spread further away from the boat, while maintaining the bait/lures’ swimming action.
I’m going to work from the biggest “bait” concentration out. I run 2 spreader bars, either “Tiki Bars“ or “Mini Bars“, right off the rod tips. They are run about 70-100 feet back and they are staggered in distance to on another. These will be the center of my “bait ball”. These “Tiki Bars” are 20 inches wide and hang nine 9” bulb squid as “teaser” baits. Each of the 3 rows of baits is lead by a small bird for splash and action. The trailing bait is a Shooter with a rigged ballyhoo. Here you can also run the “Mini Bar“. The “Mini Bar” is a 9 inch bar made of (8) 5 inch Shooters. The “Mini Bar” can also be run off of the outriggers in the short position. If I’m in the pit on a boat with less beam, I’ll run “Mini Bars” instead of the “Tiki Bars (pictured)” off the long flats. This gives a little more room between the opposing positions.
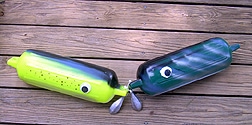
Next are my rigger baits. Depending on water conditions, I’ll run single rigged ballyhoo with Shooters on both of my short riggers and either the same on my long riggers, or I’ll change them out for “Conga Line” daisy chains. The calmer the conditions, the more splash I want to make, so the “Congas” come out and take over the long riggers. By using the combination of both daisy chains and single baits, you are extending the size of the “bait ball” over the surface, making it more enticing to the tuna. Many times I will exchange the Shooter/ballyhoo rigs for naked hooked lures. Running jet-head , chuggers or smoker type lures in the same positions are very effective. Get Reel “T.C.B.’s” move a lot of water and leave a tremendous smoke trail, indicative of a wounded, or fleeing bait fish. They can be rigged either with ballyhoo or without. On days with more wind or sea action a heavier lure is needed. Here I’ll place a “Heavy D” or rig a G&H lure with ballyhoo. These will track great in rougher seas and stay in the tuna’s strike zone. Now on boats with only one outrigger position available, I’ll opt for single rigged Shooter/ballyhoo combos or hooked lures run on the outriggers just behind the spreader bars on the long flats. These will represent your “weak” fish in the bait ball.

My Shotgun usually consists of a Boone Bird with either a hooked lure or a lure/ballyhoo combination. The bird adds a ton of splash and commotion far from the boat. It is usually run at least 300 feet from the boat, sometimes up to 600 or more. It should still fall within 15-20 feet behind your long rigger baits. I’ll talk about size of baits shortly, but this is the one place that I’ll run a large to horse ballyhoo for tuna.
Second to my rigger locations, the flat lines can see the widest choice of baits to put in the water. I like fishing on the surface, so I’ll normally start with a rigged ballyhoo, either with a G&H Seawitch or a Get Reel Shooter on my longer side and a natural cedar plug on the other. The cedar plug will be run tight to the boat, usually only 12-15 feet back, right in the prop wash. These wood sticks drive tuna nuts, and will bring them right to the stern of the boat without hesitation. If I really what to push the tuna over the edge, I’ll run a daisy chain of cedar plugs. Small jet-head style lures like Get Reel “Bullets” are great on the flat lines, too. They’ll track straight and stay just under the surface, right in the strike zone of tuna.
If we’re not getting hits on the surface, I’ll first exchange one of the flat line baits for a diving plug, like a Boone Marauder or a Rapala Magnum. These plugs will dive down several feet and waddle through the water triggering tuna to strike. They can also act as a teaser of sorts. Larger plugs can duplicate the food chain and start the competitive feeding instincts of near by tuna. Remember that a tuna has to compete with many species of fish for the same food sources. If a tuna sees another fish feeding, he’s going to want to get in the buffet line, too.
If we’re marking fish down deep and not getting many surface hits, we’ll break out the planner rod. I first encountered this system fishing with Bob DuBell, captain of Team “Still Think’n”. The planner system is very effective in getting baits down deep while trolling. It starts with a very stout rod and reel combination. Depending on the size of the planner you run, you want to have a reel that will handle the continuous drag from the planner being pulled through the water column. The set up is fairly simple. If you’re running hi-vis line, you want to attach a length of clear mono, at least 100 feet. This can be done via Spro swivels, or knot connections, like a Bimini to Bristol knot. If youre running clear mono as your main line, just strip out 100 or more feet. Next take 28-32 inches of the same size mono and crimp the end closest to the reel to the main line. Then move towards the end on the line approximately 3 inches and crimp that to the main line. This has created a small “loop”. Now 3 inches from the end of your 28-32’ piece, crimp to the main line and then crimp the end to the main line, creating a similar loop like the other end. You’ll end up with a 28-32” section of double line with 2 loops, one and each end. The planner itself will be rigged with spring loaded carabineers. These carabineers will be hooked to the main line through the loops created with the crimps. Attach a snap swivel to the end of you 100 foot line and attach your bait of choice. To deploy the rig, let out you bait and line until the double line clears the rod tip. Then attach the planner to the loops and set the planner in. It will engage and dive deep, pulling the bait below the surface. You can run planners from size 6 up to 16. The bigger the number the larger planner and the deeper it runs. Also the heavier tackle you’ll need to withstand the drag. When a fish hits it, the planner will pop and you back off the drag and fight the fish. Once the planner nears the rod tip, it is removed from the loops and the fight continues as normal. This system is very successful on fish down deep that wont surface. Team “Still Think’n” had this in service when they took second place in the ’07 Oregon Inlet Tuna Roundup.
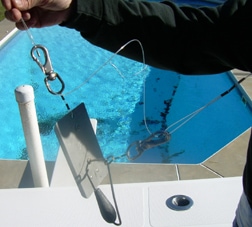
Teasers. Many believe, “if it ain’t got a hook, it doesn’t go in the water”. While chasing Yellowfin this holds true, with one exception. I strongly believe in the fender, or bumper, teaser. We run a painted bumper as a teaser that is roped off to a stern cleat and run approximately 30 feet back. Its primary purpose is to feed on the Yellowfin’s competitive nature. The thinking behind the Bumper is that a tuna will see what appears to be another fish feeding on the “bait ball” and come in to take a taste for itself. The Bumper has proven its worth many times, even at raising larger predators. We’ve retrieved Bumpers flattened due to shark attacks.
I talked earlier in the “What” section about the feeding preferences of tuna. I said they seem to target smaller baits. This influences by choice of ballyhoo. I have found that I catch more fish while using small to medium size ballyhoo then any other. My “Mini Bars“, “Conga Lines” and “Tiki Bars” reflect the same. Their teaser lures are from 5 to a max of 9 inches, matching the tuna’s main food sources of squid, flying fish, and small tinker mackerel. There is the old saying, ”Big baits, big fish”. That can hold true, but also remember this; “Elephants eat peanuts”. The key is to match the hatch. Not necessarily the actual fish, but the size is more important. Some charter captains will have their mate gut the first tuna they catch to see what its been eating and adjust their spread accordingly. You would be amazed at how different a 6” bait can sometimes out fish a 9” bait of the same color.
Color. That’s a big question in fishing, “What color is hot?” The majority of the baits that I run are blue and white. This coloration imitates flying fish, small skipjacks, and mackerel and is probably one of the best colors used in the Mid-Atlantic. Saying, that one would think we pull all blue and white lure and baits. Not so. There are two schools of thought on the issue of color. One goes along with the “School of Bait” theory in that to really replicate an entire school in your spread, all the baits should be the same size, shape and color. I lean more towards the other thought of mixed baits in the spread. I’ll mix the colors, and sizes, of baits when lines first go in the water. Sizes will be from 6-9 inches like discussed earlier. Colors will range from blue and white, green, green and black, blue and pink, pink, and purple and black. If the tuna are feeding on flying fish or mackerel, the blue and whites, greens, and purples seem to do the best. If squid are in the area there is a tendency towards the pink colors. I’ll use darker colors, like purple and black or green and black, on baits that I run close or in the prop wash. Once a bait gets hit, I’ll take note of it. If I see that the tuna are leaning towards one color over another, I’ll change some of the other baits out to the “hot color of the day“. Same goes for bait size, and even position. If the majority of the hits are coming on the long rigger baits, for example, I’ll reposition the spread to put more of the spread into play. In this case, by dropping the entire spread back so the short rigger baits are now in the previous long rigger position, you have a better chance of multiple hook-ups.
Something I hope you’re noticing is “Change”. It’s a repeated theme in tuna fishing. From temp changes to bottom changes, to the changes made in your spread while trolling, being able to find change and adapt accordingly is paramount. Yes, there are baits that work well all the time and those are always in the spread. However, you have to be ready to change ineffective baits with something else that might work better that day.
Now that you’ve successfully raised a tuna and got your first hook-up, what do you do now? Tuna travel in large schools, so where there’s one tuna, there’s many. Two schools of thought ring true here as well. One is that you maintain your current speed in a straight course. The school came into the spread for some reason and by altering your course you can loose the school. The other thought is that you turn the boat into the bite. This makes the inside baits fall, appearing wounded, and the outer baits move faster, skipping across the surface like a fleeing bait fish. This can trigger another strike from the following school. Regardless of the thinking you take, keep the boat in motion. If you have the crew available, have the others drop back a few baits, or have some reel in a few several feet. This will give the same appearance as turning into the bite and hopefully score you and your buddies a multiple hook-up.
Once you feel you’re out of the school, the fight is on. Tuna are dogged fighters. They’ll have a screaming initial run and then down they go for the tug-of-war. Keep constant pressure on the fish, getting line back whenever you can. While fighting, keep the boat in gear and moving forward. Also keep as many lines in the water and active as possible. This is easier with tuna since most of the fight happens straight down. Even though you’re moving much slower than you’re normal trolling speed, the school of tuna can still crush the spread. As the fish nears the surface and the fight nears its end, the tuna will begin its “Circle of Death”. The tuna will start to swim in circles, getting tighter and tighter together. This is the time when the leader man and gaff man start to get into position to land your catch. Watching and reading your fish are important as another dive to the bottom could happen, or a charge to the boat in hopes of cutting the line. The entire time of the fight, the boat should be in gear in a forward motion. This helps prevent the tuna from running ahead of the boat in a last ditch effort to get rid of the hook. Now get the fish on ice and get fishing again. Go right back to where you caught the last one and work that area hard.
Again, important things to remember are to find “change” and be ready to “change” your presentation. Being flexible will better your chances of landing more Yellowfin tuna. These are just some tips that I’ve put into play and have been very productive. These are by no means the only ways to get tuna on the troll. Take from this what you can and learn from others. Once we stop learning, its time to hang up the rods and reels.
Helpful video, How to clean a Tuna:


 Views Last 7 days : 1866
 Views Last 30 days : 8782